Showing posts with label Photo Tutorial. Show all posts

Sunday, February 24, 2013

How to Measure for Woolies!

Regardless of if you want a lovely pair of custom woolies from my shop, are trying to buy a pair from your local diapering store or a website, or are looking to purchase used, you need to know how to measure your little one to get the best fit. If you are measuring for a custom pair, you will of course get a perfect fit-but if not, at least you can get a good fit! One thing to note: wool is quite stretchy, so it's generally not a great idea to add a whole lot to the measurements-if you do, you may find that you end up with a gorgeous pair of woolies that are too big for your little one! At most, I recommend adding 1/2-1 inch to the rise and 1 inch to the legs.
You Need:
An adorable baby and a measuring tape! The booger sucker is optional. All measurements should be done over a diaper, preferably the diaper or type of diaper you are likely to use with your woolies!
 

For All Wool Garments

Rise
Start at the baby's belly button, then pass the measuring tape down under their crotch

Hold the front of the measuring tape in place, then flip the baby over and bring it up to the top of the back of their diaper.
 Waist
This can be measured right at belly button level. Wrap the tape around, then read the number!
 Hips
Do this at the widest part of the baby's hips. Again, just wrap the tape around and then read!

For Longies (Pants)

You can measure leg length several ways. The 2 easiest are below. If your child is old enough, you can also take this measurement while he/she is standing. All should be measured from the diaper's crotch, not the very top of the legs, as most woolies have a gusset that allows extra room for the diaper and is not considered part of the leg length.
Measure your child lying down. Start at the crotch of the diaper and measure down as far as you want the legs to go. Note that most babies bend their knees, so make sure you account for that!

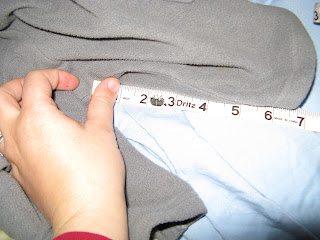
Or find a pair of pants that fits well and measure that from crotch to hem (note, I just grabbed a random pair of pants for this picture-these are too short for my son as you will notice if you look at the measurements! LOL)

For Shorties and Skirties

This is optional, but you may want to measure how long you would like your shorty/skirty to be. If so, you measure from the crotch again, but just stop at whatever point you want the garment to stop.

For Diaper Covers/Soakers

You are going to want to measure the thigh. I like to take this measurement just outside the leg openings of the diaper, since that's where you want the leg openings of your cover to be.
Just wrap around and read!

Side view!

And that's it! Pretty easy, right? Let me know if any of these don't make sense or you want more detailed photos!

Tuesday, January 8, 2013

How To Lanolize-A Photo Tutorial

As I mentioned in the last post, I think wool care is intimidating for people. However, it really is very simple! Lanolizing is one of the biggest parts of wool care, and it is very easy. Now, you should note that there are ALL kinds of ways to lanolize depending on what products you have. I'm going to show you how to do it in the easiest way possible with lanolin that you probably already have on hand.
Lanolin is a natural oil produced by sheep. The purpose of lanolin (when on the sheep) is to weatherproof their coat (ie waterproof!! Very nice for a diaper cover!), condition their wool (man, I wish my head made its own conditioner!), and keep their coats clean (lanolin plus wool plus moisture=natural soap). When applied to your diaper cover wool, this means that lanolin will help your wool to absorb more water before feeling damp (wool will absorb moisture regardless of whether it is lanolized-but it absorbs a LOT more if it is lanolized!), keep your wool feeling soft and luscious against your baby's skin, and it is the reason that you should only have to wash your wool every few weeks to months (depending on how many times it gets wet).
Lanolizing needs to be done before you use your wool for the first time, and again every time you wash your wool (not necessarily talking about spot cleaning for a little bit of poop here, but if you wash the whole cover, you will need to relanolize). Assuming you don't have a major poop blowout at some point and your cover is just getting a little urine on it, you will know it's time to relanolize when your cover starts to retain a bit of a urine/nitrogen smell or if you notice that you are starting to get some leaking or a lot of dampness on the cover but the diaper underneath it is not thoroughly soaked.
There are a LOT of lanolin products out there and at some point, I will probably do a blog post that talks about those options more specifically. However, for today I'm going to show you how to easily lanolize a cover using products that you probably already have around your home (and if not, you can get these easily and cheaply at any drug store or online). I apologize for the less than ideal picture quality-these were taken using a camera phone but hopefully you can get the idea!

First, you need to gather your "ingredients": a sink or bucket, a container with a lid that can hold at least a cup of water, lanolin, baby soap, a towel, and of course, your cover!


Just to verify-yep, this is Medela lanolin-the type that you used at the very beginning of breastfeeding (and hopefully don't need anymore!!! Any pure lanolin will work, though.
 

Okay, on to the lanolizing! Fill your sink (or bucket, etc.) with room temperature water.


Add a pea sized amount of lanolin to your container


Add one drop of baby soap-this helps the lanolin dissolve better.


Add about a cup of VERY hot water (not boiling, but very hot). Put the lid on and shake really hard so that the lanolin and soap dissolve into the water. When they dissolve, it should look like this-a milky whitish liquid.


Pour the hot water/lanolin mixture into the sink and stir it around a little. Then submerge your diaper cover in the water. You are going to have to hold it underwater long enough for the fibers to soak in enough water to stay submerged, or it will just float on the top (remember, even without lanolin, wool absorbs a fair amount of liquid!!


Let the diaper cover soak in your lanolized water for at least 15 minutes. You can leave it in there for longer than that without a problem, so you don't have to be too precise about this! In fact, some sources I have read have stated that covers can even soak overnight. So it's up to you-go kick your feet up, or chase your child around, or whatever! You've got some time. :-)


Remove the garment from the water and allow some of the moisture to drip into the sink. I usually just wait until the water stops "pouring" off. :-) Do NOT "wring" the garment of squeeze it against itself, as this can cause it to begin to felt and decrease the "life" of your precious and beautiful wool!


Place the garment on top of a towel.
Fold the other half of the towel on top of the garment and press straight down. This will "push" some of the liquid out of your garment. I just push down over each area of the garment a few times. When you are done, the garment will feel damp and saturated, but should not feel soaked or be dripping. If it is, move it to a dry part of the towel and repeeat the pressing process.

Last step! Place your garment somewhere relatively flat to dry. I usually put it across the corner of my diaper drying rack, but you could also lay it flat (You would need to turn it over if you do that). Wool takes a few hours to dry after this process, typically.

Tah-Dah!!!!
You have now successfully lanolized your wool garment. See how easy it is? It takes time, but the vast majority of the time is letting it soak. The actual time you have to spend actively doing something is probably less than 15 minutes-and remember, with wool you only have to do this process about once a month (can be as often as every 2-3 weeks if you are using it a LOT or as infrequently as every 2-3 months if you are only using it at night with another cover in the rotation).
It should be noted that your cover is going to smell a little "sheepy" (if you sniff the lanolin before you start this process-that's a "sheepy" smell and what you will smell on the cover after you lanolize it). This will be fairly faint and fade away after a few uses, but if it bothers you (my hubby and I like it-it's a pretty natural smell, and he grew up on a wool processing farm, so it's very nostalgic for him!) you have some options! You can add a drop or 2 of an essential oil in any scent to the lanolin mixture before you shake it up, or there are TONS of lanolizing products out there in every scent imaginable. You CAN also rinse your garment in vinegar and that will get rid of the sheepy smell, but I would WAY prefer my covers/clothing to smell like sheep versus vinegar-but that could just be my own personal preference.
Any questions? Anything unclear? Let me know and I'll clarify as needed!