Friday, March 15, 2013

When Buying Used

Sorry for my long absence! I have been quite busy the last few weeks (mostly working on orders, which is great! Keep them coming in!).
Today's topic is what to look for when buying used wool. I am definitely of the "buy used to save money" persuasion in most areas, and generally buying used has worked very well for me. Wool can be quite expensive, so it's definitely helpful to save on it however possible! However, there are a few things to be aware of when buying wool used.
The biggest thing you want to know is whether your used wool has any (unintended) felting. The area where this is most likely to occur is in the wet zone, but it could also happen to the entire garment if someone accidentally tossed it into the dryer or dried it over a heat register. Note that felting will not interfere with the garment's ability to absorb moisture, but it will make a huge difference in fit-wool that has felted usually loses its stretch. The stretchiness of wool (in my mind) is one of the things that really contributes to its value-typically your child can wear the same wool garment for months and it will fit well because it will stretch to accommodate them. You just have to decide how much this is going to be an issue for you-if the price is really great and you are fine with the garment only fitting for a few weeks to a month, then go for it! However, if you really want something that is going to grow with your child, you may want to be cautious about felting. Now, you should realize that a little bit of felting can occur without loss of stretch. If you are there in person, just take the garment in your hands and stretch it around to see how much stretch and/or rebound it has! If you are buying online though, you are taking the word of the seller as to whether it has a lot of stretch left or not, and that can be a little chancier.
Felting is a bit difficult to see in photos, but below are some examples. Hopefully the seller will disclose any felting issues-if not, I recommend asking about them prior to purchase!

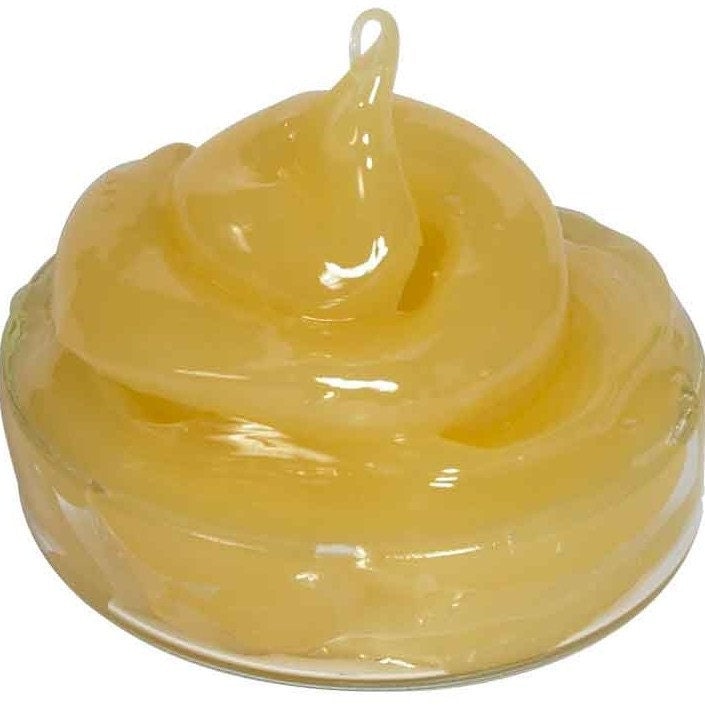
If you look closely at the wet zone, you can see how it is a bit "softer" looking and the colors almost seem to bleed into each other-this is typical of felting. I would call this moderate felting-so probably some stretch left, but not a ton.

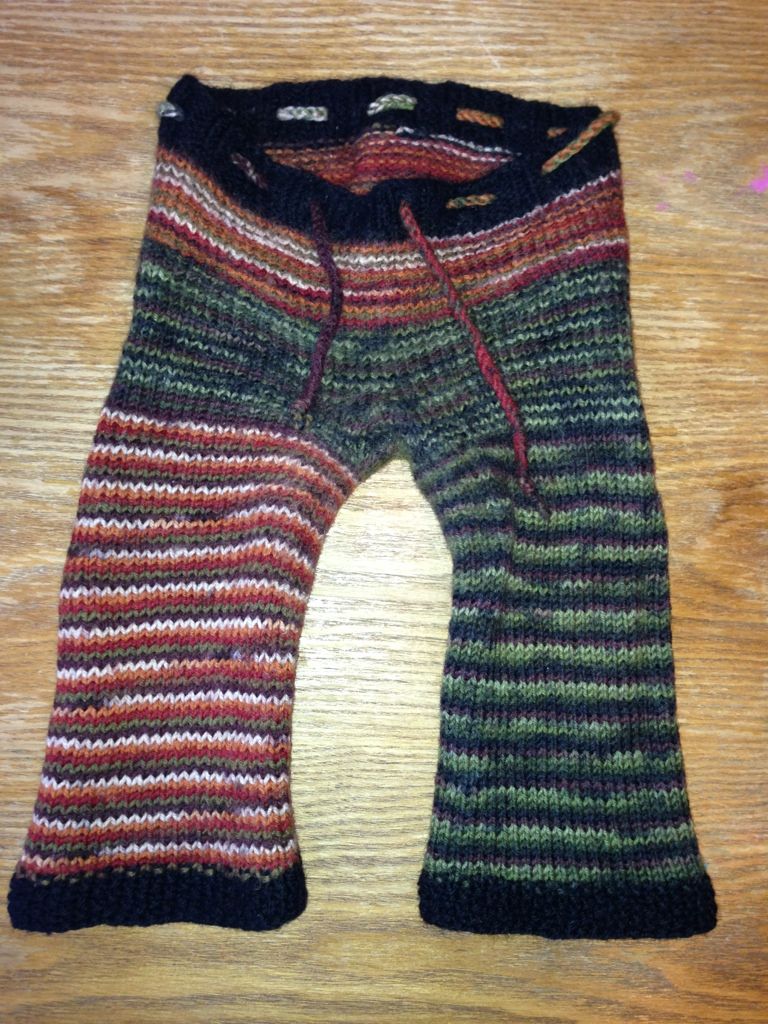
These are interlock soakers that were accidentally felted.
Some other things to ask about:
What was used to wash these? (If they say "woolite" then run away!)
Any holes or wear/tear?

If the "for sale" listing states that the wool could use a shave, that is fine! It does not impact the function of the wool garment in any way whatsoever. It just means it will look a little "fuzzy" (see this post for details). You can shave it (or ask them to) if you want, or not-just depends on your personal preference! One thing to note-shaving with a non-quality shaver can eat holes into your garment, so be careful! If you have them shave it, ask for a photo again after it has been shaved.
One of the great things about wool, and the reason it holds its value, is that it is VERY hardy and holds up incredibly well while retaining its shape and function. Most likely, buying used will be a great way for you to grow your stash if you are looking to save a little money (but be aware-you won't save a ton of money-as I said, it holds its value very well! As a general rule, my new garments are less or equal to the price of used wool, at least for right now while I am building my business. However-you may find a mama who is just looking to get rid of outgrown items and she may give you a great price, so it's worth a look!).

Sunday, February 24, 2013

How to Measure for Woolies!

Regardless of if you want a lovely pair of custom woolies from my shop, are trying to buy a pair from your local diapering store or a website, or are looking to purchase used, you need to know how to measure your little one to get the best fit. If you are measuring for a custom pair, you will of course get a perfect fit-but if not, at least you can get a good fit! One thing to note: wool is quite stretchy, so it's generally not a great idea to add a whole lot to the measurements-if you do, you may find that you end up with a gorgeous pair of woolies that are too big for your little one! At most, I recommend adding 1/2-1 inch to the rise and 1 inch to the legs.
You Need:
An adorable baby and a measuring tape! The booger sucker is optional. All measurements should be done over a diaper, preferably the diaper or type of diaper you are likely to use with your woolies!
 

For All Wool Garments

Rise
Start at the baby's belly button, then pass the measuring tape down under their crotch

Hold the front of the measuring tape in place, then flip the baby over and bring it up to the top of the back of their diaper.
 Waist
This can be measured right at belly button level. Wrap the tape around, then read the number!
 Hips
Do this at the widest part of the baby's hips. Again, just wrap the tape around and then read!

For Longies (Pants)

You can measure leg length several ways. The 2 easiest are below. If your child is old enough, you can also take this measurement while he/she is standing. All should be measured from the diaper's crotch, not the very top of the legs, as most woolies have a gusset that allows extra room for the diaper and is not considered part of the leg length.
Measure your child lying down. Start at the crotch of the diaper and measure down as far as you want the legs to go. Note that most babies bend their knees, so make sure you account for that!

Or find a pair of pants that fits well and measure that from crotch to hem (note, I just grabbed a random pair of pants for this picture-these are too short for my son as you will notice if you look at the measurements! LOL)

For Shorties and Skirties

This is optional, but you may want to measure how long you would like your shorty/skirty to be. If so, you measure from the crotch again, but just stop at whatever point you want the garment to stop.

For Diaper Covers/Soakers

You are going to want to measure the thigh. I like to take this measurement just outside the leg openings of the diaper, since that's where you want the leg openings of your cover to be.
Just wrap around and read!

Side view!

And that's it! Pretty easy, right? Let me know if any of these don't make sense or you want more detailed photos!

Thursday, February 21, 2013

Fuzz Factor!

So any of you who have used wool for any length of time know that it tends to get a bit fuzzy. If you are new to wool but have been looking into it, you may have noticed the words "needs a shave" in the description for some used items. What is the deal with fuzz?
Well, here's the thing. Sheep's wool is intended as a weatherproof covering. It is designed to stick together and for the fibers to go in multiple directions to prevent the sheep from being impacted by crazy weather changes. Wool also has a good "memory" meaning that the fibers tend to always try to return to their original organization.
This is a photograph of what sheep's wool looks like right after it has been removed from the sheep. Notice the matted fibers (and the dirt! LOL!). This is actually a really good thing because it is part of what "waterproofs" the sheep (this is why sheep are not miserably wet and cold even when standing in the rain). Now, when wool is being prepared to be made into clothing, it goes through a process:
First, it gets carded by hand or machine. Carding is basically running the wool between 2 big brushes to make the fibers lay in the same direction (more or less).
Once it has been carded, the wool looks like this. Notice how the fibers are all more or less in a straight line now.
Then the fun part-it gets dyed into gorgeous colors! Now it is called roving.
Once you get to the roving stage you can either spin it into yarn OR just knit the roving.
Now, this  characteristic of wool is actually one of the major things that makes it most suitable for diapering! The more the fibers stick together, the more absorbent the diaper cover is, because the fibers will fill in the "holes" that are created with knitting. I typically knit out of roving instead of yarn because this makes the cover more absorbent and "leak proof." However, it also makes it slightly "fuzzier" in appearance as a new cover. A cover knit from yarn will have less initial fuzz, but also more holes and thus a bit less absorbency/will leak sooner. So it kind of depends on what you are wanting! If you are ordering from me, if you prefer yarn over roving, please tell me-I am more than happy to do either!
One thing to know about wool though, is that because of the "memory" that I talked about earlier, ALL items that are made out of wool will fuzz eventually. The more wool content, the more tendency to create that fuzzy effect. Because diapering wool is usually at least 75% wool (preferably 100%), the "fuzz factor" is high! So even items made of wool yarn will eventually look fuzzy (though they will probably nto start out looking that way-that completely depends on the yarn used). The other thing to know, especially if you are considering buying used, is that the fuzz does not show up well in photographs. You kind of have to take an out-of-focus, oddly angled photograph to capture it. I tried to do that this morning so you could kind of see....
This is what a pair of woolies made from roving looks like from a "top shot"

The same pair from that weird side angle-you can probably see the mild fuzz. This is probably a typical amount for the type of roving I usually work with. Of note, these have not been lanolized. The lanolization process does decrease the fuzz.

This is my store bought sweater that is 20% wool. I've worn it about 15 times total, I think. You can see the fuzz forming on the bottom, and this sweater was machine knitted from yarn made of 80% cotton and 20% wool.

This is the fuzziest/"worst" roving I have ever worked with, so this is about as bad as you can expect it to get.

This is the leg of a pair of overalls I am working on, knitted from yarn. So you can tell that even yarn can end up pretty fuzzy!

Hopefully those images give you a bit of an idea of what to expect!
Now, I am personally not bothered by a slight bit of fuzziness. To me, it just lends a "soft" look to my baby's woolly bottom, which is okay with me. However, you do have some options if you just hate the fuzzy look-aka shaving your garments (so when you see the phrase "needs a shave" that means the garment has become fuzzy). Please note-no matter what wool fiber (yarn, interlock, roving) your garments are made from, if you want to keep them looking "sharp" and completely not fuzzy, you will have to do this process on a regular basis.
The way a wool shaver works is exactly the same as the way an electric shaver works for a person. It runs over the top and "cuts" the fibers close to the smooth surface of the fabric while vacuuming the cut fibers into a little container. I have not personally used wool shavers, so I cannot give you a review on different brands or suitability for use. I can tell you that I would not recommend using one that looks like this:
The reason is that these types of shavers are intended to pull the errant fibers out instead of clipping them close to the source, and by doing so, you are likely to eventually cause your wool garments to unravel. The good ones look more like this:

This one is being used on a 50% wool sweater (machine knit out of yarn)-you can see the difference between the shaved fibers on the left and the unshaved fibers on the right.
If you are going to purchase a wool shaver, I would recommend that you read lots of reviews first! The thing I would worry most about is the fibers getting caught in the shaver and pulling, potentially creating a hole. I have friends who have told me that this has happened to their sweaters. Even better, if you know of a friend who has a shaver and likes it-go with their brand!
Shavers are pretty easy to use-you just run it over the garment in question!
Hopefully this was helpful-as always, let me know if something was unclear or could use more information!

Friday, February 15, 2013

Lanolin-the Magic Behind the Wool!


So by now, hopefully you know that wool is pretty much the most awesome thing to happen to cloth diapering! If you are confused or just want to review the basics, go for it! This  post is for those of you who, like me, are geeky enough to want to know, not just THAT things work, but WHY they work!
So the magic behind the magic, if you will-is this mystery ingredient called lanolin! Lanolin is an oil that sheep naturally produce. It is what helps them to "weather proof" their coats/wool. When wool is processed into something usable for clothing, it is typically washed (usually many times!). This process removes the lanolin. Now, it is also possible to spin and work wool without doing the washing-this is called spinning or combing "in the grease." However, this leaves the wool waterproof enough that it won't take to dye very well, so in most cases, you are not going to find bright colored wool that has been worked this way.
So what does lanolin do when we are talking about diapering? Several key things-in essence, lanolin is what makes your life as a wool diaper cover-user SO much easier!
  • Lanolin helps the wool to wick moisture away from the baby's body and hold it within the wool (you can think of this as helping to waterproof the wool). Wool which is lanolized can hold up to 1/3 its weight in liquid-this is a LOT of liquid when you are considering that diapering wool is the final barrier over a diaper.
  • Lanolin "conditions" the wool and helps keep it soft. It also helps keep the fibers healthy and lying in the same direction-meaning your diaper wool will last longer. But my favorite thing that lanolin does is...
  • Lanolin is the reason your covers are self cleansing! When the diaper wool gets wet (urine), the fibers swell as they absorb the fluid. This causes them to rub lightly over each other. The lanolin (mixed with urine) creates a natural "soap" that neutralizes the uric acid (the "waste" part of urine) and then that "rubbing" motion is just like scrubbing. This is why you can hang damp wool to dry, and when it is dry, it is clean! It won't even smell musty (or if it does, you need to relanolize your garment).
Now, on a sheep, the lanolin is an oil produced by glands within the sheep, so it is constantly replenished. However, since your wool garment is (we hope!) no longer actually attached to the sheep, you will have to replenish the lanolin. On average, this needs to happen once every 4-12 weeks, depending on how you are using the garment and how many times the lanolin is "used."
Lanolin comes in all forms:
This is solid lanolin-you can buy it from Amazon or Ebay. I use Medela or Lansinoh (the kind you get for breastfeeding issues) because I have that left over from when my guy was little. It is not expensive!

This is liquid lanolin/wool wash. This is readily available-just make sure when you are buying it that it has a high concentration of lanolin (there are wool washes that are made for clothing items, but you want ones made specifically for diapering!).
If you need instructions on how/when to lanolize and wash, feel free to check out these posts.
Also, don't forget that there is a soaker up for grabs (for FREE!) here!
Happy Friday, everyone!

Tuesday, February 5, 2013

Wool As a Diaper Cover

So now we have covered some of the basics of how wool works, what some of the differences are between types of wool, and how to care for wool. Does anyone have any questions about any of these topics? Or is there another burning question that you would like help troubleshooting? Please let me know! You can message me via facebook (https://www.facebook.com/ALambsTail) or leave a comment here.
I'm going to do sort of a "wool basics wrap up post" and the next few posts will cover some things in more detail-and then I'm going to have to get creative or maybe just chatty! :-)
So why does wool work well as a diaper cover? The easiest answer is that it absorbs liquid (ie urine!) very well, it is soft, and it is beautiful! There are lots of different things you can use as a diaper cover-PUL/plastic (this is what typical cloth diaper covers are made with), fleece, and wool are the most common ones. You do have to use an actual diaper under all these types of covers, by the way! None of them are absorbent enough to be a diaper in and of themselves.
Key things that set wool apart from other types of diaper covers:
  • Natural fiber-both PUL and fleece are manmade/synthetic fibers. This is not bad in and of itself, but some kids are sensitive to the materials in PUL and/or fleece as well as the materials in regular diapers. Even if this is the case for your child, wool is worth a try!
  • Breathes-even though we are used to thinking of wool as intended for warmth and winter garments, wool actually "breathes" very well, and does not transfer heat or hold it in-it actually helps you maintain your current body temperature! (sheep are not sheared during the summer because they are hot, but rather because summer is the only time of year when they can survive without their coats long enough to re-grow them as we use their fleece for something else! They'd be perfectly happy to stay "clothed" year round) PUL and fleece both hold heat in-again, not necessarily bad in and of itself, but some children are sensitive to this.
  • Easy to care for-unlike fleece, you don't have to wash and treat it every time you use it, but rather about once every 4 weeks to 3 months, depending on how you are using it and how big your rotation is. PUL is the easiest type of diaper cover to care for, hands down. But wool is not nearly as hard as most people think!
  • Absorbs excess liquid as opposed to trapping it against the child's skin (which is how both fleece and PUL keep kids dry).
  • Can double as both your diaper cover AND clothing in one!
At the end of the day, your choice of diaper cover is going to depend on a lot of factors, many of which are personal in nature! No one can make that decision for you. However, most people I know who have tried wool LOVE it-some convert completely to wool for their diaper coverage, and other people use it as one of several options in their rotation!
Oh, and one more thing-even if you use disposable diapers, wool can serve you well! Aren't you tired of washing the sheets every night? If you use a wool garment as pajama pants/shorts, you probably won't have to anymore! Just put it on over the diaper, and no more wet sheets. :-)

Thursday, January 24, 2013

Wool vs Fleece

A question I frequently see on message boards and/or am asked is "What is the difference between wool and fleece longies?" Well, there are several key differences (it's sort of like asking "what's the difference between pocket diapers and all-in-ones). As with anything cloth diapering related (or perhaps anything in life!), which one you choose is going to be a personal decision where you have to weigh your own values and what is most important to you in your cloth diapering journey! For some, it will be cost, for others, it will be durability, for others it will be ease of use, and yet others may feel strongly about natural vs synthetic fibers. At the end of the day, I just want to shed some light so you understand the differences and can figure out what is best for your family! Here goes...
What They Do
Both wool and fleece are typically used as moisture barriers, and often they are used as extra moisture barriers for heavy wetters. They can be just used on their own-neither requires a diaper with PUL underneath. Both require a diaper of some type (fitted, prefold, leaky pocket, etc.) but said diaper does not need to be waterproof on its own. Both of them can either be used as a cover and clothing in one (longies/shorties) or as a typical cover with clothing over the top.
How They Look
Both can be heartstoppingly cute, especially on a baby's cute little tushy! Both are available in all kinds of colors. Fleece is more likely to be available in a pattern and looks like fabric (you know what fleece looks like-you probably have a pair of fleece pants yourself!). Wool can look like fabric or not, depending on what type you get.
How They Work
Have you ever noticed that if you spill a liquid on fleece, it doesn't soak in, but rather beads up? Eventually, if it sits there long enough, it will soak in, but it doesn't right away and you can sort of brush it off. Well, fleece is a manmade/synthetic fiber and a bit of liquid-repelling is in its nature. Fleece covers take advantage of this property and hold the moisture on the inside (side of the baby's skin) when treated appropriately (more on this later).
Wool is a natural fiber (from sheep, usually, although you can also use alpaca and other fibers-but it's usually sheep's wool as this is the least expensive) which tends to absorb moisture (and can absorb a LOT of moisture before feeling wet!). So wool holds the urine away from the side of the baby's skin instead of against it.
The end result from either is dry sheets! They just use 2 different routes to get there.
Use and Care
Fleece needs to be washed after every use/diaper change.
Wool is washed about once every 4-8 weeks (depends on how you are using it) unless it gets poop on it.
Fleece can be washed with your regular laundry in the machine.
Wool needs to be either hand washed or washed VERY carefully by itself (instructions here)
You need to treat fleece with fabric softener every time you wash it. This helps enhance the fluid repulsion and makes for a better diaper cover.
Wool needs to be treated with lanolin (a natural oil which sheep produce-this oil helps the wool absorb more and also is what makes wool covers self cleaning as long as they are just wet) each time you wash it.
Cost
Wool is going to be a lot more expensive than fleece. Fleece is manmade from plastic, essentially, and so it is cheap and readily available-you can even find lots of cute prints in the remnants section of any store, most likely, that will work for your little one (because you don't need much fabric)! Wool, on the other hand, has to grow on an animal, get removed from that animal, and then get processed (I will probably do a post on this later as it's kind of cool) and dyed, etc. before being made into your garment. However, since you have to wash fleece each time it is used and wool only every few weeks, you could get away with 2-3 wool covers vs dozens of fleece covers (if you were using ONLY wool or fleece covers) and you would also generate a lot less laundry. Thus, it somewhat depends on how you are going to use them!
DIY-Friendliness
If you have a sewing machine and a basic pattern along with a basic sewing skill set, you can make fleece longies and shorties. Soakers are a little trickier, but still doable with some practice. Total time to complete a pair is probably in the 1-2 hour range.
If you are an experienced knitter, you can probably make your own longies, shorties, and covers! There are free patterns available for personal use on the internet. However, if your knitting experience is limited to dishrags and scarves, I don't necessarily recommend trying to make an article of clothing next. It may be frustrating! I am a very experienced knitter (of clothing as well as other items) and it takes me about 10 hours to make a soaker, 12 to make shorties, and 15 or more to make longies. Obviously, that will vary depending on the size of the article in question!
Baby Comfort
Some children are allergic to the synthetic fibers in fleece (or fabric softener!) so make sure you know if your child is okay with having fleece next to their skin before investing much in a bunch of fleece articles! If your child has skin issues with microfiber or other synthetic fibers in their diapers, fleece may not be your best route.
A very few people are allergic to lanolin. If your child tends to break out if you apply lotions, I'd stay away from wool. Some families note that they tend to get itchy with wool. If this is the case for your family, make sure your wool articles are made from a super soft wool such as merino, cashmere, or angora (though angora would be extremely expensive!).
In the summer, fleece may be too hot for your little ones. Fleece works by trapping heat against the body-this is why it is SO warm and lovely/cozy in the winter. This is just a characteristic of this type of fabric and cannot be changed.
Wool, on the other hand, is a natural fiber (basically sheep's hair) and breathes. This means that instead of trapping heat against the body, wool does not transfer heat. It keeps the skin at whatever temperature it was at prior to the garment being put on. This makes it VERY warm and cozy in the winter, but light and cool in the summer. Generally, hand knitted items will breathe a little better than interlock or upcycled.
Any Questions?
As always, feel free to comment or contact me if you have any questions or something isn't clear!

Tuesday, January 22, 2013

Wool Basics-Drying Wool and Sizing Issues

I know, for some of you who are experienced wool users, this post will probably seem a bit elementary. That's okay-you can skip it. ;-) For those who are new to wool, there are a few things that you should know which will make your life easier and hopefully prevent any harm from coming to your gorgeous new woolies! As always, if any of this is unclear. let me know and I will clarify!
Heat will make wool shrink/felt. The higher the heat, the worse the shrinkage. Therefore, do NOT put your wool in the dryer (unless your goal is to felt it), and it is also not a good idea to lay your wool garment over a heat register to dry. While this won't cause as drastic of changes, it will do damage over time. If you are in a hurry for your wool to dry, you can put a fan on it, and the moving air should help.
Water/liquid makes wool heavy! I know you have all seen photos of woolies hanging adorably on clotheslines, but this is really not a great idea either. The reason is that the weight of the water will pull down against the clothespins and cause your garments to stretch. Wool does have good "memory" (meaning it will tend to return to its original shape and size unless you interfere with it), but over time this will stress the fibers and cause wear and tear (and holes!) to happen more quickly. The best way to dry wool is to lay it flat, preferably on an aerated surface, with as much support as possible. Ways you can do this are: use the top "row" of a drying rack (this is generally what I do), string cheesecloth or another aerated but supportive fabric (with lots of holes) out and lay it on top of that, or just lay it flat and go flip it every once in a while.
Making your wool dry faster: The more surfaces exposed, the faster it dries (so it will be slower if you have it flat on a countertop, etc. versus something that is aerated). You can use the sun, but watch for signs of fading (depending on the person who dyed the wool-some dye jobs hold up to the sun very well, others do not, so this is going to be an experimental thing). You can blow a regular fan on them; no hair dryer (unless you use the no heat setting) or heat register though! Really, the best way to make your wool dry as quickly as possible is to squeeze as much water out as possible (using the towel squeeze or towel roll method-more than once if necessary!) prior to laying it out to dry.
What if I accidentally shrunk my wool?
All is not lost, as long as the shrinkage and felting are minimal. Get your garment completely wet (soaked), then gently stretch it out to its previous size and either pin it there or use something heavy to hold it there. Hopefully, when it is dry, it will retain this size and shape.
Can I stretch my wool?
All wool has some inherent stretch to it! Hopefully your garment will stretch as much as you need it to just with normal wear. If you want to try to increase the size of the overall garment, you can try-just be aware, there will be some limitations and you may end up damaging your wool. It's up to you whether that is a chance you want to take! You can either use the method above to stretch it, or you can stretch your garment out and then block it (blocking is when you use a steam iron which is hovering just BARELY above the surface of the garment-this will help the fibers relax).